

Table of Contents
- What You'll Need to Protect Enamel Pins
- Step 1: Choose the Right Pin Backs for Security
- Step 2: Install an Insert Board for Structural Support
- Step 3: Arrange Your Pins to Prevent Rotation and Loss
- Ita Bag Pin Display Tips for a Cleaner Look
- Preventing Pin Scratches on Ita Bag Windows
- Step 4: Secure Pins to Backpack Fabric and Straps
- Repairing Damaged Pin Posts and Long-Term Care
- Frequently Asked Questions
Last Updated: September 13, 2026
What You'll Need to Protect Enamel Pins
Protecting enamel pins in ita bags comes down to controlling three forces: impact, friction, and moisture. This guide walks through the setup we recommend, from backing hardware to display placement, so you can protect enamel pins in ita bags step by step.
Here's your starter kit:
- Locking pin backs (the metal kind with a set screw, not the standard rubber clutch)
- A foam or felt insert board cut to your bag's display window
- Badge covers sized to your pin faces
- Heavy-duty double-sided tape or adhesive hook-and-loop strips
- A small repair kit: spare pin posts, super glue, and fine-grit sandpaper
The U.S. Consumer Product Safety Commission guidance on small parts is a useful reference if you're buying pins for younger collectors, since pin posts and clutches fall into the same small-parts category as many other accessories.
Step 1: Choose the Right Pin Backs for Security
The right pin back depends on how often you swap your display and how much lateral force the bag sees. Rubber clutches suit a static home collection; locking backs are the only option for a bag that leaves the house.
Rubber Clutches vs. Butterfly Clutches
Rubber clutches grip through friction alone. They're cheap and easy to remove, but friction fails: every bump loosens the grip, and the rubber hardens and shrinks over time.
Butterfly clutches use two spring-loaded metal wings that bite into the post. They hold better than rubber but still release under sharp lateral force, and the wings bend with repeated removal. Neither suits a bag that swings, drops, and gets shoved into overhead bins.
| Backing Type | Holding Strength | Removal Speed | Best For |
|---|---|---|---|
| Rubber clutch | Low | Instant | Static home display |
| Butterfly clutch | Medium | Fast | Light daily wear |
| Locking pin back | High | Slow (requires tool) | Ita bags and travel |
| Magnetic back | Medium-high | Fast | Pins you swap often |
How Locking Pin Backs Actually Hold
Locking pin backs for ita bags work through one of two mechanisms, and knowing which you have changes how you install and remove them.
Set-screw locks use a small hex screw that tightens against the post inside a metal barrel, creating a mechanical clamp that won't release until you back the screw out with a hex key. These are the most secure option and the hardest to remove in a hurry.
Barbed-sleeve locks use a spring-steel collar with inward-facing barbs. Push the back onto the post and the barbs grip; twist and pull firmly to remove. No tool is required, but the grip is slightly less absolute than a set screw, and the barbs wear down after dozens of removals.
A third option, the clutch-and-cap combo, pairs a butterfly clutch with a decorative metal cap that threads over the post end. It looks cleaner and adds a second retention point, but still relies on the butterfly clutch as the primary grip.
Matching Backs to Post Diameter
Not every back fits every pin. Standard posts run about 1.0 mm to 1.2 mm, but novelty and older pins can run thinner or thicker (Circular of the Bureau of Standards no. 433::physical properties of dental materials). A locking back sized for a 1.0 mm post will slide on a 1.2 mm post and never clamp properly, which is why some collectors swear locking backs "don't work" when the real issue is a mismatched size.
Before buying a pack of fifty, measure a few posts with calipers or test-fit a single back. If it slides on with no resistance, it's too loose; if you have to force it past the barrel opening, it's too tight and you risk bending the post.
The trade-off is real: swapping pins takes longer, and you need to keep the tiny key accessible. If you rotate displays weekly, a barbed-sleeve lock is the better compromise because it removes by hand. For pins you never rotate, a set-screw lock is the strongest hold you can buy.
The U.S. Consumer Product Safety Commission guidance on small parts is a useful reference if you're buying pins for younger collectors, since pin posts and clutches fall into the same small-parts category as many other accessories.
Step 2: Install an Insert Board for Structural Support
An insert board is a rigid panel behind your bag's display window that gives every pin a stable mounting surface. Without one, pins hang on thin fabric, wobble constantly, and stress the post at its weakest point.
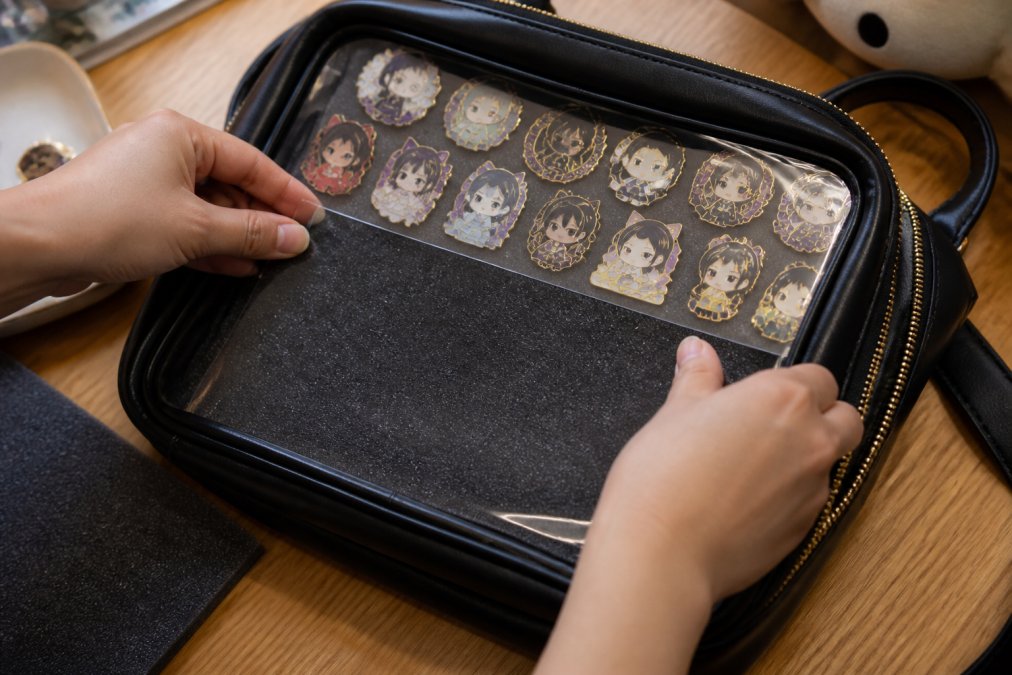
Cut the board to match the window dimensions exactly. A loose board shifts inside the bag and drags pins against the plastic, which is how most scratches start.
Craft Foam and Felt Backing Options
Craft foam gives you thickness and shock absorption. A 6mm sheet handles impact from a dropped bag far better than fabric alone and holds a pin post snugly without letting it rotate.
Felt backing is thinner and softer. It looks cleaner behind a display window and won't bulk up a slim bag, but offers almost no impact protection. Use felt as a decorative layer over foam, not as the structural layer itself.
Step 3: Arrange Your Pins to Prevent Rotation and Loss
Pin rotation is a layout problem, not a hardware problem. Pins rotate because they have room to move, so the fix is spacing and weight distribution.
Start with your heaviest pins at the bottom. Weight at the bottom keeps the bag's center of gravity low and stops the arrangement from shifting when the bag swings. Lightweight pins go up top.
Leave a finger's width between pins. Crowded displays force you to pry pins apart during swaps, which bends posts. If you're short on space, rotate your collection seasonally instead of cramming everything onto one board.
- Group by theme so you swap whole sections at once
- Keep your most valuable pins toward the center, away from bag edges
- Avoid placing heavy pins directly above light ones
- Test the layout by shaking the bag gently before you leave the house
Ita Bag Pin Display Tips for a Cleaner Look
A clean display reads as intentional; a cluttered one reads as a pile. The difference comes down to alignment, color flow, and negative space.
Line up pin posts on a grid rather than eyeballing placement. Even spacing makes a mixed collection look curated, even when the pins have nothing in common. If your bag has a framed display window, treat the frame edges as your grid lines.
Color flow matters more than theme for visual impact. Arrange pins so similar colors sit near each other, then let one contrasting pin anchor the center, the fastest way to make a random collection look deliberate.
Preventing Pin Scratches on Ita Bag Windows
Scratches come from two sources: the pin face rubbing against the window, and the window rubbing against whatever the bag touches. Both are preventable.
Keep a small gap between the pin face and the window plastic. If your insert board sits flush against the window, every pin is in constant contact and every bag movement creates friction. A few millimeters of clearance eliminates most surface wear.
Badge Covers and Mylar Face Protection
Badge covers are thin plastic sleeves that slip over an individual pin. They absorb friction that would otherwise hit the enamel and are cheap to replace when cloudy.
Mylar face protection works the same way at the bag level. A mylar sheet behind the display window takes scratches instead of the window itself; when it gets scuffed, you swap the sheet, not the bag.
For long-term preservation, keep your bag out of direct sunlight and store it in a dust bag between conventions. UV exposure fades enamel color and yellows clear vinyl, and no backing upgrade reverses that damage.
Step 4: Secure Pins to Backpack Fabric and Straps
Pins on the main display window are the easy part. Pins on straps, flaps, and fabric panels need a different approach because there's no rigid board behind them.
For fabric mounting, add a small square of craft foam or stiff interfacing behind the fabric before pushing the post through. This gives the post something to bite into and spreads the load, preventing the fabric from tearing.
Heavy-duty tape is a backup, not a primary fix. Run double-sided tape between the pin back and fabric only after the backing is secured. Tape alone fails in heat and leaves residue that's hard to remove without damaging the weave.
On a strap, place pins on the flat section rather than the curve. Curved surfaces put constant sideways pressure on the post, the fastest route to a bent or snapped pin.
Repairing Damaged Pin Posts and Long-Term Care
Most guides stop at loss prevention. The harder problem is what happens after years on a bag: posts fatigue, enamel fades, and metal backs rust. This section covers the repairs and preservation steps that keep a collection intact past the first convention season.
Straightening a Bent Post
A bent post isn't a dead pin. Straighten it slowly with flat-nosed pliers in small increments rather than one hard bend. Metal fatigues fast, so a post straightened twice is on borrowed time. If it feels springy or creaks, stop, the next bend will snap it.
Reattaching a Snapped Post
A snapped post is a common failure collectors encounter, and it's fixable for display use.
- Clean both broken surfaces with fine-grit sandpaper (around 400 to 600 grit) to remove oxidation and give the adhesive something to bite into.
- Degrease with isopropyl alcohol and let it dry completely.
- Apply a small amount of two-part epoxy or gel super glue to one surface, not both, so you don't create a thick glue line that throws the post off-axis.
- Hold the post in alignment for a full minute, then let it cure overnight before remounting.
A glued post holds for display but won't survive heavy handling, so move repaired pins to a static board or a window you don't remove from the bag. If the post snapped flush with nothing left to glue, display the pin with a magnetic back or a pin-display stand rather than retiring it.
Preventing Rust on Posts and Backs
Humidity is the quiet killer of pin hardware. Steel posts and spring-steel barbs rust from the inside out, and by the time you see surface discoloration, the post has already lost strength. Store off-season pins in a sealed container with a silica gel packet, swapping the packet every few months as it saturates.
For pins that stay on a bag year-round, a thin coat of clear nail polish or metal sealant on the post and back slows oxidation without affecting the pin face. Reapply when the coating wears thin at the contact points.
Protecting Enamel from UV and Temperature
UV exposure fades enamel color and yellows clear vinyl windows, and no backing upgrade reverses that damage. Keep display bags out of direct sunlight and store them in a dust bag or opaque container between conventions. A bag on a shelf near a window fades within a season or two; the same bag in a closet looks new for years.
Rapid temperature swings are the other threat. Enamel and the metal base expand and contract at different rates, causing hairline cracks along pin edges over time. Avoid leaving a display bag in a hot car or freezing trunk. If you do, let it return to room temperature before handling pins, cold enamel is more brittle and a pin that pops off a cold post is more likely to chip.
Cleaning the Display Window Without Scratching It
Clear vinyl and acrylic windows scratch easily, and a scratched window makes even a perfect collection look worn. Wipe with a microfiber cloth and mild soap-and-water solution, never a paper towel or dry cloth that's picked up grit. For deeper scuffs, a plastic polish for clear vinyl can restore clarity, but test it on a corner first because some polishes cloud softer vinyl.
For collectors building out a display, Commerce Gluttony stocks ita bags and accessories. Our team picks pieces for material stability, not just looks, and free shipping kicks in on orders over $100.
Frequently Asked Questions
How do you keep enamel pins from falling off an ita bag?
Locking pin backs are the most reliable option. Unlike rubber clutches that can loosen over time, locking backs use a mechanism that requires a tool or firm squeeze to release. Pair them with an insert board so pins stay anchored to a stable surface rather than shifting fabric. For extra security, add a small piece of heavy-duty tape over the post on the inside of the bag. Check your backs monthly, especially after conventions where bumping and jostling are common.
What are the best pin backs for ita bags?
Locking pin backs offer the best security for ita bags because they resist accidental removal during wear. Rubber clutches work for lightweight pins but can slip off fabric over time. Butterfly clutches are easy to remove but prone to loosening. For valuable or heavy pins, combine locking backs with an insert board and felt backing. This three-layer approach distributes weight and prevents the pin post from tearing through bag material.
Do I need to use locking pin backs for my ita bag?
Not always, but they help significantly if you wear your bag daily or attend conventions. Locking pin backs for ita bags prevent pins from rotating, falling off, or being accidentally knocked loose. If your pins are lightweight and you rarely move the bag, rubber clutches may suffice. However, for expensive or sentimental pins, locking backs are worth the small investment. They also make it harder for someone to remove a pin without your knowledge.
How do you prevent pin damage in an ita bag display window?
Preventing pin scratches on ita bag windows starts with spacing pins so metal backs and posts do not rub against the clear plastic. Use an insert board covered in felt or craft foam to cushion pins and absorb impact. Avoid overloading the window, which causes pins to press against the plastic. If scratches appear, a plastic polish can minimize them. For long-term protection, consider a badge cover or mylar face on individual pins before placing them in the bag.